Effective security camera placement improves visibility, reduces blind spots, and allows you to detect essential behavior before it becomes an issue. The appropriate placements are critical for deterring break-ins, monitoring deliveries, and tracking interior movement. Cameras placed in the incorrect locations might miss important moments, waste storage space, and even cause legal problems. Every section, from front doors to stairwells, has a unique security role. This tutorial explains where to place cameras outside and inside your house, what areas to avoid, and how to avoid typical setup mistakes, resulting in greater coverage and stronger safety year-round.
Where Are the Most Important Places to Install Security Cameras?
Front Door, Back Door, and Main Entry Points
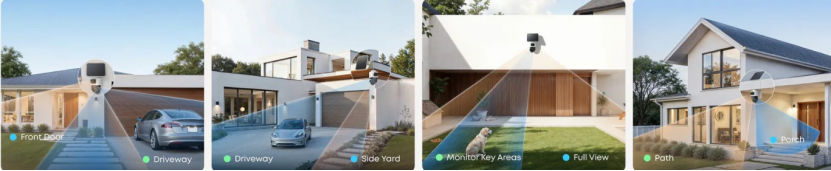
Front doors are the most often targeted entrance point, making them the top priority for any security system. To get clear footage of faces and parcels, place a camera above or to the side of the entrance, angled downward. Unauthorized access is also prevalent through back doors and side entries, particularly those that are less apparent from the street. Cover each doorway with a wide-angle lens, or utilize numerous cameras to provide complete coverage. Motion detection and two-way audio on doorbell cameras make them even more convenient. Securing all entrances allows you to track who enters and departs your property at all times.
Driveways, Garages, and Ground-Level Windows
Driveways and garages contain high-value objects such as vehicles, tools, and motorcycles, making them popular targets for theft. Install cameras at the garage entrance and driveway entry to monitor vehicle activity and unwanted visits. To protect cameras from the weather, mount them over the garage or under the eaves. Ground-level windows, particularly those that are not visible from the street, are equally vulnerable. Place cameras to cover these windows without seeing into neighbors’ houses. For nighttime visibility, consider versions equipped with infrared or spotlights. Proper placement deters break-ins and provides clear video proof if someone tries to enter your property through less visible entrance points.
Yards, Fences, and Outdoor Access Areas
Cameras in your front and back yards identify intruders before they enter your house. Install cameras on fences or looking outward from the home to monitor property boundaries. Concentrate on entrances, pathways, and other spots where someone may enter or hide. Choose weatherproof versions with a broad field of vision and motion detection. For bigger estates, consider solar-powered cameras for further flexibility. Covering these outside areas can also aid in monitoring pets, youngsters, and animals. Visible cameras serve as effective deterrents, while strategically positioned devices identify suspicious behavior before it becomes a security problem.
How Should You Place Indoor Security Cameras for Best Coverage?
Living Rooms, Hallways, and Common Areas
Indoor cameras are more effective when positioned in core locations where movement is anticipated. Living rooms, kitchens, and corridors connect various portions of the house and are high-traffic areas. Place cameras in corners to provide a broad field of vision, and position them high enough to prevent tampering. Models with motion detection can notify you about suspicious activities during off-hours. To decrease glare, avoid positioning cameras directly across from windows. Covering these places allows you to track who enters or exits your house, which is very beneficial for keeping a check on youngsters, elderly family members, or pets while you’re away.
Stairways and Paths Between Entry Points
Staircases and halls between access points serve as natural funnels, making them important sites to monitor. Intruders frequently utilize these pathways to travel between floors or rooms. Place cameras at the tops of staircases or at the ends of hallways to record anyone entering or exiting. A downward viewing angle provides an excellent picture of faces and activity. If there is insufficient lighting, use models with infrared night vision. Monitoring these linking places enhances your chances of detecting illegal movement and gives a clear timeline of movements within your property in the event of an incident or inquiry.
Areas to Avoid for Privacy and Legal Reasons
Avoid putting cameras in intimate locations like restrooms, bedrooms, or places where family members change clothing. Recording in these locations may breach privacy regulations and cause discomfort in the home. In many areas, installing cameras in private spaces—even your own home—can result in legal concerns if not properly reported. To minimize complaints or legal conflicts, avoid placing interior cameras at windows facing neighboring residences. Always advise guests that cameras are being used and place them with consideration for personal boundaries. Balancing effective monitoring with privacy promotes confidence and prevents future legal issues.

Common Security Camera Placement Mistakes to Avoid
Incorrect Height, Angle, and Field of View
Mounting a camera too high can hinder facial recognition, while positioning it too low makes it simple to deactivate. The recommended height for outdoor units is 7 to 9 feet, while inside units should be slightly above eye level. Cameras should be angled somewhat downward to catch faces, entrance motions, and ground-level activity. Avoid directing them too far down or straight ahead, since this might distort the image and cause motion to be missed. Make sure the field of vision is neither too narrow nor too wide, as this might result in gaps or stretched pixels. Before deciding where to install each camera, test its angle in live view to provide the optimum coverage.
Poor Lighting, Sun Glare, and Obstructions
Many homeowners don’t consider how lighting influences footage. Cameras facing intense sunlight may cause glare or silhouettes, making faces difficult to recognize. Similarly, installing cameras in dark regions without night vision reduces visibility at night. Use infrared-equipped models or external lights to improve clarity. Avoid installing near reflecting surfaces, such as windows or metal objects, since these might distort pictures. Keep cameras away from impediments such as tree branches, gutters, and hanging decorations. Examine the camera’s view at various times of day to detect glare or shadow concerns. Optimizing lighting guarantees that your film is useful whether it is day, night, sunny, or overcast.
Overlapping Coverage and Missed Blind Spots
Installing too many cameras with overlapping perspectives consumes resources and fills storage with redundant footage. However, positioning cameras too far apart might result in blind zones where action goes unobserved. A clever arrangement balances coverage from various viewpoints while avoiding excessive overlap. Draw a map of your property and highlight essential zones such as entryways, exterior limits, and connected routes. In open locations, employ wide-angle lenses, whereas tight perspectives provide more targeted coverage. If you’re utilizing numerous cameras, stagger them to get diverse angles. Always analyze recorded footage to discover flaws and make required changes. Proper planning ensures that all critical areas are addressed without overlooking details or overloading your system.
Conclusion
Placing security cameras in the right locations ensures better protection, clearer footage, and smarter home monitoring. Concentrate on high-traffic locations such as doorways, driveways, stairwells, and common internal spaces. Avoid placement errors that impair visibility, disrupt motion, or jeopardize privacy. Always test angles, illumination, and the field of view before completing the installation. Balance complete coverage and camera count to avoid blind spots or redundancy. A strategic placement plan boosts the efficiency of your system, allowing you to repel attacks, collect relevant footage, and achieve peace of mind. With the proper camera arrangement, your house becomes a safer and more secure environment for everyone within.